An introduction to OpenCV, its applications, and the basics of image processing; including how to build a pedestrian detector and YOLO detector.
Introduction
In my childhood days, I used to often think about how the photo editing apps came to know where exactly the hair or the lips are present in order to change their color/shades. How the police force gets to know if a particular area is overcrowded when the newspapers used to reveal the exact number of people present at any area. How about just having a car which takes us to the destination so my dad doesn’t have to drive and make questions. Sometimes I used to think this was some kind of magic or say my fantasies. I even remember that my grandma used to ask me to smile else the camera won’t take my picture maybe she referred to facial expression recognition. 🙂
Lately, I realized that all this is possible through AI and computer vision. Last month I visited my university after almost a year of being online learning and was glad to find the facial mask recognizer system which doesn’t allow people to enter without a proper mask covering their face and nose. It is even amazing that how Google photos segregate pictures into separate folders using facial recognition that too with almost 100% accuracy.
Also, the Facebook algorithm identifies people before we even tag them. What makes all this possible?
It’s Object Detection. Objection Detection has got a wide variety of applications that could make the study of literally everything possible just by looking at the images. Isn’t it exciting? Let’s dive into its technical aspects first.
What is Object Detection?
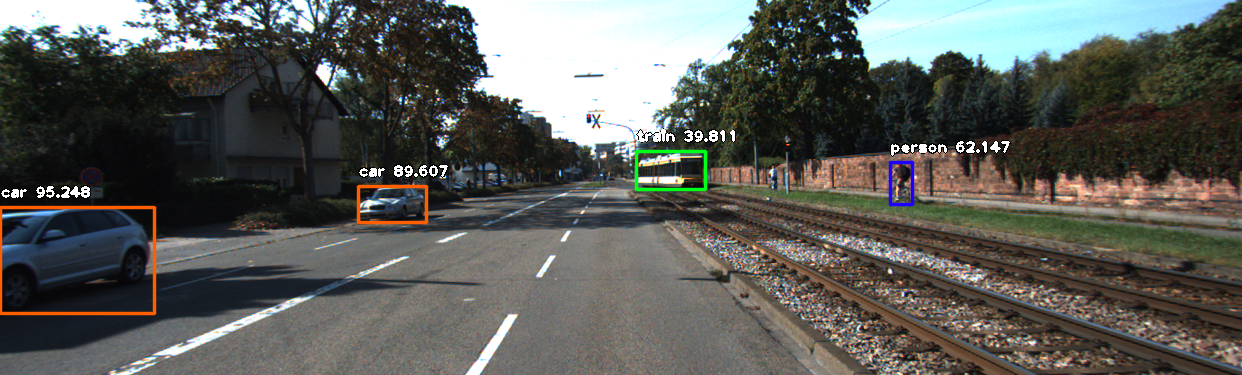
Object Detection is the path toward finding genuine objects like vehicles, bikes, TV, and people in still pictures or Videos. It thinks about the affirmation, limitation, and ID of different things inside an image which outfits us with a significantly improved cognizance of an image all things considered. It is conventionally used in applications, for instance, picture recuperation, security, surveillance, and so forth.
Applications Of Object Detection
Facial Recognition: We can also recognize body language, facial language, facial sentiment recognition, Covid19 mask detection, etc. Face-detection algorithms focus on the detection of frontal human faces. It is analogous to image detection in which the image of a person is matched bit by bit. Image matches with the image stored in the database.
Individuals Counting in Crowd: This is one of the crucial applications, recently used in the Omdena-iRAP challenge. Where we built the model for the recognition of pedestrians on-road and which was further mapped to reducing the chances of accidents and saving lives. For a glimpse of the case study about the challenge, read here.
Self Driving Cars: Another one of the most interesting topics of AI. It is based on object detection is for autonomous driving is For a car to decide what to do in the next step whether accelerating, apply brakes, or turn, it needs to know where all the objects are around the car and what those objects are That requires object detection and we would essentially train the car to detect known set of objects such as cars, pedestrians, traffic lights, road signs, bicycles, motorcycles, etc.
Security: This feature of the object is found in our cell phones nowadays, where we store our images in the database and it maps when we try to open the lock. It works so well in some of the sophisticated devices that it can open the lock or block your access just by looking at your eyes.
Each Object Detection Algorithm has a substitute technique for working, nonetheless, they all work on a comparative rule; feature Extraction. They eliminate features from the data pictures at hand and use these features to choose the class of the image. Be it through MatLab, Open CV, or Deep Learning. In this article, we start with basics then build a pedestrian detector through images.
Introduction to OpenCV
OpenCV is one of the most popular computer vision libraries. If you want to start your journey in the field of computer vision, then a thorough understanding of the concepts of OpenCV is very important.
We will deal with:
Reading an image
Extracting the RGB values of a pixel
Extracting the Region of Interest (ROI)
Resizing the Image
Rotating the Image
Drawing a Rectangle
Let us start by installing the dependency. We will need the OpenCV library to do this which can be installed as below.
pip install opencv-python
Let us first read the image:
# Importing the OpenCV library
import cv2

# Reading the image using imread() function
image = cv2.imread(‘image.png’)
Output image – Source: Omdena
# Extracting the height and width of an image
h, w = image.shape[:2]

# Displaying the height and width
print(“Height = {}, Width = {}”.format(h, w))
Output: Height = 191, Width = 264
# Extracting RGB values.
# Here we have randomly chosen a pixel by passing in 100, 100 for height and width.
(B, G, R) = image[100, 100]

# Displaying the pixel values
print(“R = {}, G = {}, B = {}”.format(R, G, B))
Output: R = 212, G = 132, B = 69
We can also pass the channel to extract the value for a specific channel
B = image[100, 100, 0]
print(“B = {}”.format(B))
Resizing the image
# resize() function takes 2 parameters, the image and the dimensions
resize = cv2.resize(image, (800, 800))
Output:
Output image – Source: Omdena
# Calculating the ratio
ratio = 800 / w

# Creating a tuple containing width and height
dim = (800, int(h * ratio))

# Resizing the image
resize_aspect = cv2.resize(image, dim)

# Calculating the center of the image
center = (w // 2, h // 2)
# We are copying the original image, as it is an in-place operation.
output = image.copy()

# Using the rectangle() function to create a rectangle.
rectangle = cv2.rectangle(output, (1500, 900),(600, 400), (255, 0, 0), 2)
It takes in 5 arguments :
Image
Top-left corner co-ordinates
Bottom-right corner co-ordinates
Color (in BGR format)
Line width
Output image – Source: Omdena
Pedestrian Detector
(Image from Pinterest: used as a sample image for code)
We will gather a principal Pedestrian Detector for pictures using OpenCV. Pedestrian recognition is a vital zone of exploration since it can upgrade the usefulness of a walker insurance framework.
We can remove features like head, two arms, two legs, etc, from an image of a human body and pass them to set up an AI model. In the wake of setting up, the model can be used to recognize and follow individuals in pictures and video moves. In any case, OpenCV has an inborn procedure to perceive people on foot. It has a pre-arranged HOG(Histogram of Oriented Gradients) + Linear SVM model to recognize walkers in pictures and video moves.
Histogram of Oriented Gradients
This calculation checks the direct enveloping pixels of every single pixel. The goal is to check how hazier is the current pixel stood out from the incorporating pixels. The figuring draws and jolts showing the course of the image getting darker. It reiterates the cycle for every pixel in the image. At long last, every pixel would be superseded by a jolt, these jolts are called Gradients. These inclines show the movement of light from light to diminish. By using these inclines computations perform further examination.
For this, we need OpenCV and imutils introduced. Which Can be installed as follows.
pip install opencv-python
pip install imutils
Install dependencies – Source: Omdena
Note: Use Jupyter Notebook on the neighborhood framework and not google colab as some OpenCV features are not upheld in Colab.
CODE:
import cv2
import imutils

# Initializing the HOG person detector
hog = cv2.HOGDescriptor()
hog.setSVMDetector(cv2.HOGDescriptor_getDefaultPeopleDetector())

# Reading the Image
image = cv2.imread(‘img.jpg’)

# Resizing the Image
image = imutils.resize(image,width=min(400, image.shape[1]))

# Detecting all the regions in the image that has a pedestrians inside it
(regions, _) = hog.detectMultiScale(image,winStride=(4, 4),padding=(4, 4),scale=1.05)

# Drawing the regions in the Image
for (x, y, w, h) in regions:
    cv2.rectangle(image, (x, y),(x + w, y + h),(0, 0, 255), 2)

# Showing the output Image
cv2.imshow(“Image”, image)
cv2.waitKey(0)
cv2.destroyAllWindows()
YOLO (You Only Look Once) is one of the important types of object detectors. YOLO is unlike most other object detection architectures in that it operates in a totally different way. The majority of methods convert the model to an image at various sizes and locations. The image’s high-scoring regions are referred to as detections. Yolo, on the other hand, uses only one neural network to process the entire image. The network divides the image into regions and calculates the bounding boxes and probabilities for each one. These bounding boxes are weighted by the predicted probabilities.
Object detection using YOLO
Conclusion
We can say that object detection has given a new face to computer vision and AI for social good. The uses of object detection we have seen the applications use of Object detection in our everyday life. Learned the basics of OpenCV and YOLO and built a full pedestrian detection model.