
Building a Risk Classifier for a PTSD Assessment Chatbot
May 11, 2020

The Problem: Classification of Text for a PTSD Assessment Chatbot
The input
A text transcript similar to:
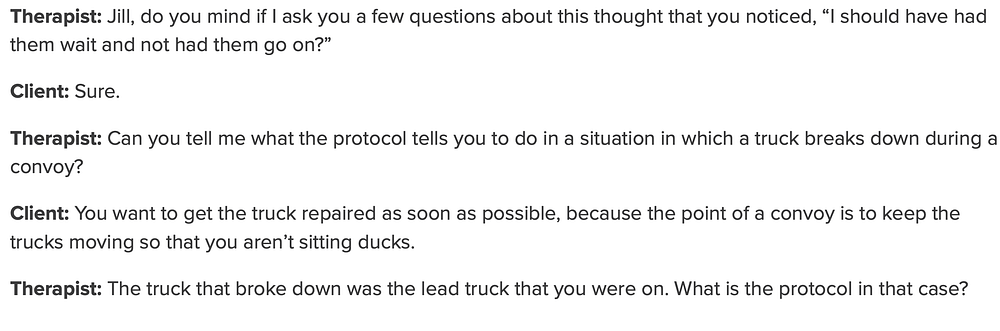
The output
Low Risk -> 0 , High Risk -> 1
One of the requirements of this project was to have a productionized model for Text Classification regarding PTSD that could communicate with a frontend, for example, using Machine Learning.
As part of the solution to this problem, we decided to explore the MLFlow framework.
MLFLow
MLflow is an open-source platform to manage the Machine Learning lifecycle, including experimentation, reproducibility, and deployment regarding PTSD. It currently offers three components:
MLFlow Tracking: Allows you to track experiments and projects.
MLFlow Models: Provides a model and framework to persist, version, and serialize models in multiple platform formats.
MLFlow Projects: Provides a convention-based approach to set up your ML project to benefit the maximum work being put in the platform by the developer’s community.
Main benefits identified from my initial research were the following:
- Work with any ml library and language
- Runs the same way anywhere
- Designed for small and large organizations
- Provides a best practices approach for your ML project
- Serving layers(Rest + Batch) are almost for free if you follow the conventions
The Solution
The focus of this article is to show the baseline ML models and how MLFlow was used to aid in Text Classification and training model experiment tracking and productionization of the model.
Installing MLFlow
pip install mlflow
Model development tracking
The snippet below represents our cleaned and pretty data, after data munging:

In the gist below a description of our baseline(dummy) logistic regression pipeline:
train, test = train_test_split(final_dataset,
random_state=42, test_size=0.33, shuffle=True)
X_train = train.text
X_test = test.text

LogReg_pipeline = Pipeline([
('tfidf', TfidfVectorizer(sublinear_tf=True, min_df=5,
norm='l2', encoding='latin-1', ngram_range=(1, 2), stop_words='english')),
('clf',LogisticRegression(solver='sag'),),
])
The link to this code is given here.
One of the first useful things that you can use MLFlow during Text Classification and model development is to log a model training run. You would log for instance an accuracy metric and the model generated will also be associated with this run.
with mlflow.start_run():
LogReg_pipeline.fit(X_train, train["label"])
# compute the testing accuracy
prediction = LogReg_pipeline.predict(X_test)
accuracy = accuracy_score(test["label"], prediction)

mlflow.log_metric("model_accuracy", accuracy)
mlflow.sklearn.log_model(LogReg_pipeline, "LogisticRegressionPipeline")
The link to the code above is given here.
At this point, the model above is saved and reproducible if needed at any point in time.
You can spin up the MLFlow tracker UI so you can look at the different experiments:
╰─$ mlflow ui -p 60000 130 ↵
[2019-09-01 16:02:19 +0200] [5491] [INFO] Starting gunicorn 19.7.1
[2019-09-01 16:02:19 +0200] [5491] [INFO] Listening at: http://127.0.0.1:60000 (5491)
[2019-09-01 16:02:19 +0200] [5491] [INFO] Using worker: sync
[2019-09-01 16:02:19 +0200] [5494] [INFO] Booting worker with pid: 5494
The backend of the tracker can be either the local system or a cloud distributed file system ( S3, Google Drive, etc.). It can be used locally by one team member or distributed and reproducible.
The image below shows a couple of models training runs in conjunction with the metrics and model artifacts collected:
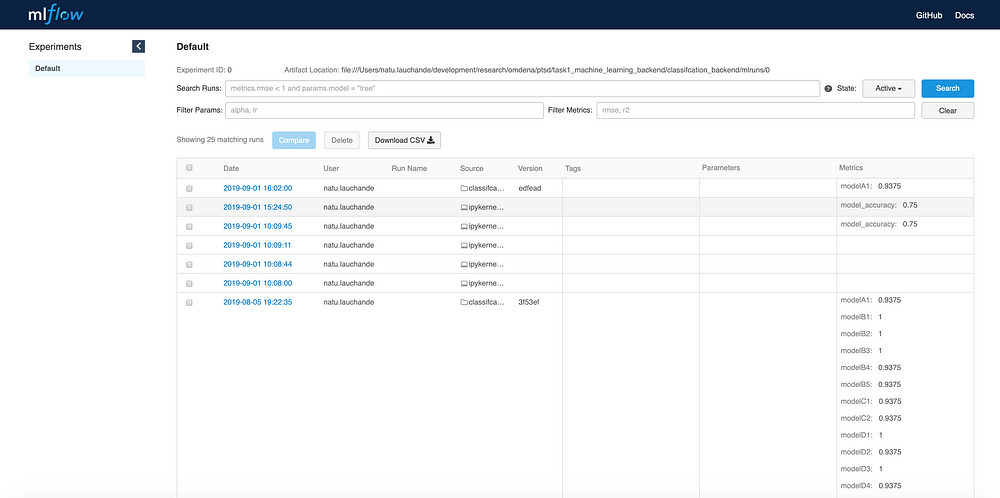
Sample of experiment tracker in MLFlow for Text Classification
Once your models are stored you can always go back to a previous version of the model and re-run based on the id of the artifact. The logs and metrics can also be committed to Github to be stored in the context of a team, so everyone has access to different experiments and resulted in metrics.
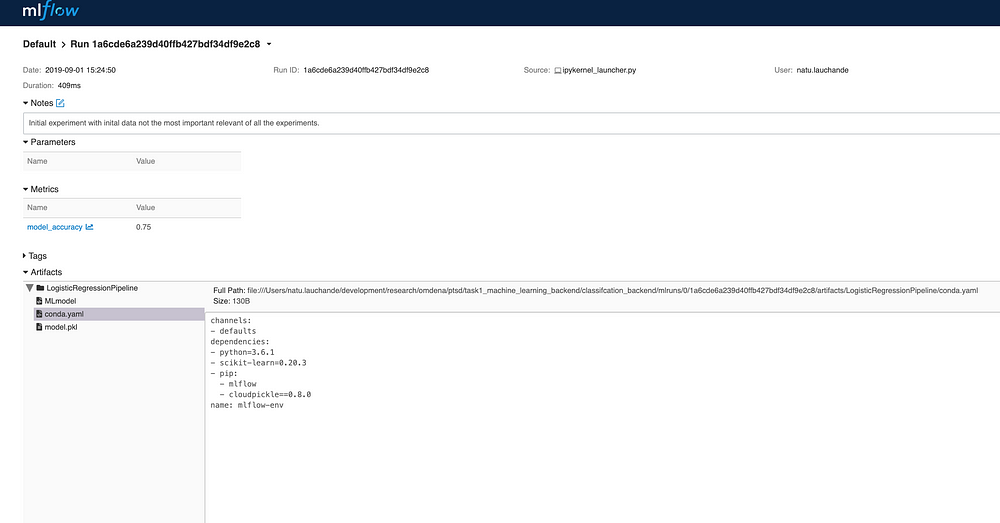
Now that our initial model is stored and versioned we can assess the artifact and the project at any point in the future. The integration with Sklearn is particularly good because the model is automatically pickled in a Sklearn compatible format and a Conda file is generated. You could have logged a reference to a URI and checksum of the data used to generate the model or the data in itself if within reasonable limits ( preferably if the information is stored in the cloud).
Setting up a training job
Whenever you are done with your model development you will need to organize your project in a productionizable way.
The most basic component is the MLProject file. There are multiple options to package your project: Docker, Conda, or bespoke. We will use Conda for its simplicity in this context.
name: OmdenaPTSD
conda_env: conda.yaml
entry_points:
main:
 command: "python train.py"
The entry point runs the command that should be used when running the project, in this case, a training file.
The conda file contains a name and the dependencies to be used in the project:
name: omdenaptsd-backend
channels:
- defaults
  - anaconda
dependencies:
- python==3.6
  - scikit-learn=0.19.1
  - pip:
- mlflow>=1.1
At this point you just need to run the command.
Setting up the REST API classifier backend
To set up a rest classifier backend you don’t need any job setup. You can use a persisted model from a Jupyter notebook.
To run a model you just need to run the models serve command with the URI of the saved artifact:
mlflow models serve -m runs://0/104dea9ea3d14dd08c9f886f31dd07db/LogisticRegressionPipeline
2019/09/01 18:16:49 INFO mlflow.models.cli: Selected backend for flavor 'python_function'
2019/09/01 18:16:52 INFO mlflow.pyfunc.backend: === Running command 'source activate
mlflow-483ff163345a1c89dcd10599b1396df919493fb2 1>&2 && gunicorn --timeout 60 -b
127.0.0.1:5000 -w 1 mlflow.pyfunc.scoring_server.wsgi:app'
[2019-09-01 18:16:52 +0200] [7460] [INFO] Starting gunicorn 19.9.0
[2019-09-01 18:16:52 +0200] [7460] [INFO] Listening at: http://127.0.0.1:5000 (7460)
[2019-09-01 18:16:52 +0200] [7460] [INFO] Using worker: sync
[2019-09-01 18:16:52 +0200] [7466] [INFO] Booting worker with pid: 7466
And a scalable backend server (running gunicorn in a very scalable manner) is ready without any code apart from your model training and logging the artifact in the MLFlow packaging strategy. It basically frees Machine Learning engineering teams that want to iterate fast of the initial cumbersome infrastructure work of setting up a repetitive and non-interesting boilerplate prediction API.
You can immediately start launching predictions to your server by:
curl http://127.0.0.1:5000/invocations -H 'Content-Type: application/json' -d
'{"columns":["text"],"data":[[" concatenated text of the transcript"]]}'
[0]%
The smart thing here is that the MLFlow scoring module uses the Sklearn model input ( pandas schema) as a spec for the Rest API. Sklearn was the example used here it has bindings for (H20, Spark, Keras, Tensorflow, ONNX, Pytorch, etc.). It basically infers the input from the model packaging format and offloads the data to the scoring function. It’s a very neat software engineering approach to a problem faced every day by machine learning teams. Freeing engineers and scientists to innovate instead of working on repetitive boilerplate code.
Going back to the Omdena challenge this backend is available to the frontend team to connect at the most convenient point of the chatbot app to the risk classifier backend ( most likely after a critical mass of open-ended questions).


